Take note of the following prior to beginning construction
· All hardware is to be hand tightened. Do not use air tools or electric drills.
· These instructions are intended as an aid to installation. Every boat is different and improvisation is needed to mount your tower on your boat. Having an experienced professional complete the installation for you could be a wise investment if you are not confident in your own ability to complete the installation in a structurally sound and cosmetically appealing manner.
· This tower is designed for one wakeboarder or skier at a time. Multiple riders or tubes should not be towed with this tower.
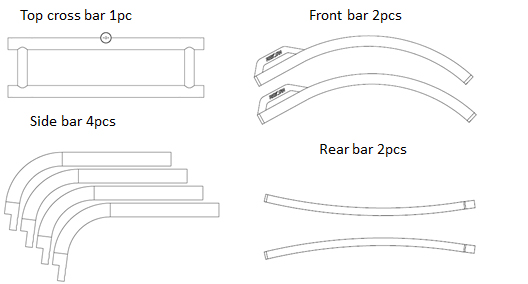
Contents of Box
· Before you begin assembly, place the contents of the box onto a soft surface and inspect for missing or damaged parts caused by shipping. If parts are found to be missing or damaged, please contact us as soon as possible.

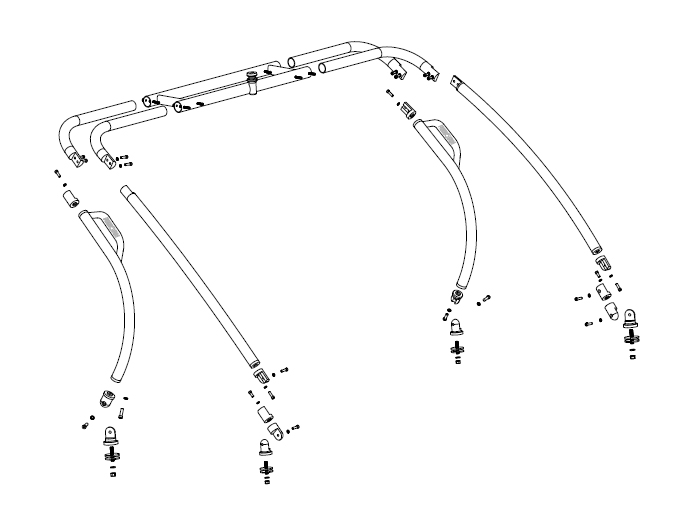
Step 1 – Ground Assembly of the tower
· Locate the four side bars. Place masking tape around the section of tube that slides into the top cross bar. Also, be careful when sliding these sections together. The tape will allow adjustment of the tubes without scratching their surface during assembly. The masking tape will be removed after the bars have been drilled in the final assembly step. The surface of the bars should look perfect.
· Use the exploded drawings below to assemble the tower on the ground. Do not drill any holes into the tower at this point. Do not tighten any bolt at this stage. The folding kit should attach to the end of rear legs such that the tower will fold toward the stern. (The hinges will allow folding in 1 direction only.)
The Reborn logo should face outward on the front bars and forward on the top cross bar.
The M12x30 bolts are to be used for the rear feet.
The M14 all thread rods are used for the deck mounts.
The M12x40 bolts are used for all other connections in the ground assembly stage.
Step 2 – Installation of the deck mounts
· Using the below picture on the right as a guide, determine the best location to place the tower on your boat. Keep in mind this is a facing forward tower, make sure the tow point towards rear If you are not sure where is the best position to install the tower, please see the right picture for a reference.
· Place masking tape onto your boat where you will drill holes for the placement of the deck mounts. Use the diagram below to determine the exact position for the deck mounts and make a mark on the tape.
Warning: Before drilling into your boat, please check that you have clear access to the area beneath and that no objects, wires, or other hazards are present.
Tip: Do not measure from windscreen, cleats or vents as these reference points are not always square and in the same position as the opposite side of the boat. It’s the best to use the tip of the bow of the boat or the point where the deck seam meets the stern of the boat as reference points for horizontal measurements and the top edge of the deck seam molding is best for vertical measurements. Always triple-measure and check before drilling.
· Drill a pilot hole using a ¼” drill bit.
· With the drill into reverse, use a ½” drill bit to drill the hole for the deck mount.
· Use a round grinding burr to smooth the edges of the gelcoat where it meets the hole.
· Repeat the above three steps for each of the deck mounts.
· IMPORTANT: When the BOAT DECK is less than 1cm thick we strongly advise you to reinforce the mounting bracket with wood or fiberglass cloth which is at least 1cm thick.
Reinforcement plates are included in the tower mount kit. These may prevent stress on the boat which causes the gelcoat to crack.
YOUR WARRANTY DOES NOT COVER cracks or other damage to the gelcoat or boat caused by the tower.
·Remove the thread rods from the deck mounts, apply thread lock, replace and firmly tighten the thread rods.
· Place the deck mounts onto the boat. Snug the bolt but do not fully tighten at this point.
Step 2 – Detail of rear hinge

Step 3 – Adjusting the width of the tower
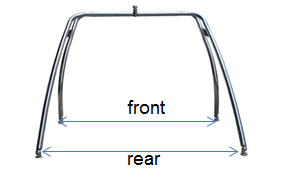
Measure the width between the front mounts and rear mounts. Adjust the width of the tower so that it will fit onto the mounts.
The front legs may either be rotated or the side bars telescoped to adjust the width. When adjusting the front legs, be certain to make our logo plate face the rear legs for the best appearance.
The distance between rear mounts may only be adjusted by telescoping side bars within the top section.
NOTE: If you have a narrow boat it may be necessary to shorten the overhead bar to make the tower fit to your boat.
Step 4 – Placing the tower onto the boat
NOTE: This is a job for two or more people. It may be easier if you remove the curved front bars.
Lift the tower onto the deck mounts.
Connect the rear feet to the deck mounts using M12x30 bolts with lock washers.
Re-assemble the curved front bars (if needed) and rotate them to fit the front deck mounts
Connect the front feet to the deck mounts using M12x40 bolts with lock washers.
Step 5 – Attaching the top cross bar
NOTE: Be certain all connections are snug and the tower is properly positioned. Diagonal measurements from the right rear foot to the left logo plate and from the left rear foot to the right logo plate should match. If diagonals do not match, make adjustments prior to drilling. Similar measurements could be made from the front feet. One person will need to stabilize the tower through this step.
Drill through the predrilled holes in the top cross bar from each side with 10 mm drill bit.
Install bolts and lock nuts.
Step 6 – Completing the installation
Remove the side bars one at a time. Remove the masking tape from the bar and replace the bar. The surface of the bars should look perfect.
All of the bolts now need to be securely hand tightened. Thread lock should be used for all connections with the exception of the bolt in the center of the folding kit and the bolt that secures the front feet to the deck mount.
NOTE: Throughout this step you need to repeatedly verify the correct positioning of the tower.
How to fold the tower
· Disconnect the front feet from the deck mounts.
· Carefully push the tower back towards the stern to place it in the down position.
· NOTE: The tower will be weaker when folded back. When possible, transportation with the tower in the upright position is preferred.
Care and Maintenance
Verify the tightness of all of your connections before every use.
When towing, be aware of low hanging structures or trees. You might not want to go through the drive thru line to get your lunch.
Use soap and water or general cleaners to clean your tower. Avoid abrasive materials that might scratch the tower’s surface.
Always rinse tower after use in salt or brackish water.
IMPORTANT NOTE FOR INSTALLATION
The construction of your boat, design of the deck, thickness of deck and walls and overall design may cause movement at the mounting points. If the construction of you boat causes movement at the mounting points or incorrect mounting location creates added pressure on joints increasing movement of the tower it voids warranty. If in doubt do not install the tower or seek a professional to install for you.
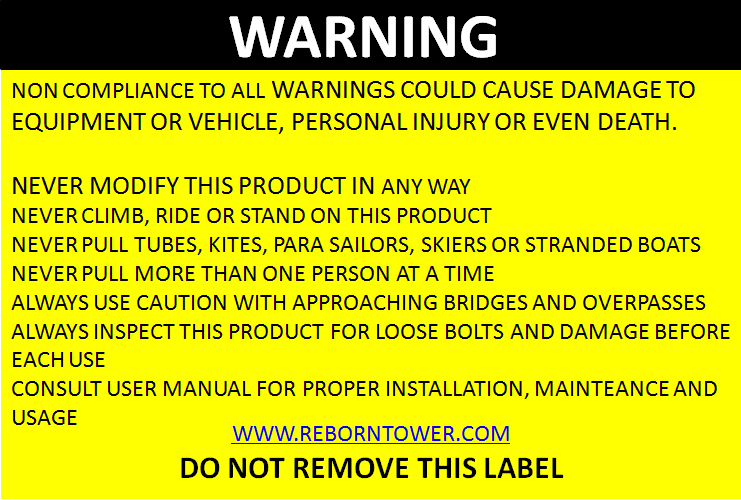
Always read the warning labeled on the tower prior to each use.